Source: UltiMaker via YouTube
Adjusting your PLA print speed can be tricky. Learn how to find the perfect print speed settings for PLA and other materials!
3D printing is often used for "rapid prototyping". The slight irony here is that individual prints can take hours or even days to complete! Fortunately, you can adjust the print speed to reduce production time. However, poor or incorrect settings can also lead to imperfections and printing failures.
In this article, we'll walk you through common 3D printer speed settings for PLA and other common materials. By the end of this article, you'll know how to strike the perfect balance between print speed and quality. So, fire up your slicing software and let's get started!
The perfect speed

Start with the manufacturer's recommended settings and adjust from there (Source: Zapador via Reddit )
As with most print settings, there is no perfect speed setting for everyone. Print speed is greatly affected by the actual build of your 3D printer, its extruder, your filament, and the size of the nozzle you use. Of course, slicer settings also play a role. What may come as a surprise is the fact that even different brands and colors of PLA may require print speed adjustments as the additives affect the properties of the base material.
For all of the above reasons, it is best to do a series of tests to determine the ideal speed for your particular machine and the particular brand of filament you will be using. The filament manufacturer's recommended settings are a good starting point, but many find that they need to change these recommendations to achieve better print quality.
In the following sections, we will walk you through several different test prints and slicer settings that will help you achieve the ideal speed for your 3D prints.
Printing speed
Ringing artifacts (right) caused by high print speeds (Source: orcinus via Thingiverse)
Print speed (Print speed ) is the main speed setting that will affect your 3D prints. As the name suggests, print speed determines how fast your printer's motors run. This includes the motors driving the X- and Y-axes, as well as the extruder motor.
To test print speed, download a print speed test model. These models usually come with instructions on how to set the correct settings. The pattern linked here will essentially print the same shape at gradually increasing speeds, allowing you to visually identify the optimal setting.
A print speed that is too slow can cause the print to warp due to the nozzle sitting on the plastic for too long. Too fast and there can be other overheating artifacts caused by undercooling, as well as ringing, underextrusion and poor layer adhesion. The sweet spot should be as fast as your printer can achieve without sacrificing too much print quality – and some use cases may require a higher level of quality than others.
In order to fine-tune the print speed better, this setting is usually divided into additional secondary settings:
- The velocity of the outer wall/shell (Outer wall/shell speed ) sets how fast the outermost perimeter of the model is printed. It is usually reduced slightly to improve surface quality.
- The velocity of the inner wall/shell (Inner wall/shell speed ) determines how quickly the internal perimeters of the model are printed. It is usually the same as the overall print speed.
- The fill rate (Infill speed ) determines how quickly the model fill is printed. It is usually the same as the overall print speed.
- Top/bottom speed) adjusts how quickly the top and bottom surfaces of the model are printed. It is usually reduced slightly to improve surface quality.
Material-specific settings
You may need to change your settings when printing with wood PLA (Source: _icantremembermyname via Reddit )
As previously mentioned, specific print speeds depend on your printer as well as the media you are using. The ideal speed for your needs must be found by trial and error. However, there are some general print speed ranges for PLA and other popular materials used in 3D printing that you can use as general guidelines.
PLA is the most popular material, mostly because of its ease of printing. In addition to standard PLA, there are some variants of PLA that can be obtained by simply inserting additives, such as PLA+, or by creating a new composite filament, such as wood PLA. These modifications in the microstructure of PLA imply an update of the mechanical properties: PLA+ increases the layer-to-layer adhesion compared to PLA, while the same characteristic decreases in PLA for wood. Of course, these modifications can lead to differences in ideal speed settings.
It is also important to be aware of the purpose of your stamp. The settings below take into account the optimal quality to print time. However, print speed tends to affect the strength of your object because at a higher speed the nozzle will not have time to extrude the correct amount of material to ensure proper deposition and adhesion. Research shows that above 80mm/s the strength of printed parts in standard PLA starts to decrease.
As for PETG and ABS, these materials have higher strength and stiffness than PLA, especially ABS. The main problem with ABS is its poor layer adhesion. A slower print speed is required to ensure proper layer adhesion and to allow each layer time to cool. It is recommended to start with a speed of 20 mm/s for the initial layers to ensure that the ABS adheres well to the build plate, then gradually increase this value for subsequent layers to a speed between 50 and 60 mm/s. PETG is quite speed sensitive so you may need to do some testing to find the best spot. You'll want to start with a slower print speed, such as 15 mm/s, and gradually increase it.
Another material we will touch on is TPU. The flexibility of this filament can make printing a challenge. High print speeds are not recommended for various reasons, as they increase the possibility of jams and printing errors. At lower speeds, the material can be properly formed along the path of the printhead.
PRINT SPEEDS
- PLA: 40-60 mm/s
- PETG: 20-40mm/s, 60mm/s maximum
- ABS: 50-60 mm/s
- TPU: 20-35 mm/s
Travel speed
Excessive movement speed can cause layers to shift (Source: Merlin via Stack Exchange)
The movement speed (Travel speed) adjusts how fast the printer's printhead moves when no filament is being extruded. Increasing the motion speed can save a significant amount of print time, but increasing it too much can lead to ringing or ghosting artifacts, or even layer displacement (and therefore a failed print). Travel speed can affect print time and distortion. Distortion is most likely to occur with ABS if the travel speed is too high.
To determine the optimal travel speed for your printer, test print at different travel speeds, starting at 100 mm/s and adjusting in 5 mm/s increments. Keep increasing the speed if the surface quality is acceptable and decrease if the print quality suffers. Watch for defects such as misaligned layers as shown in the photo above.
For PLA, you can choose a higher travel speed due to its rapid curing. PETG tends to drip from the nozzle, so it's best to increase the travel speed, bearing in mind that higher speeds can also increase stretch. A similar kind of balance has to be made with TPU. Due to its flexible nature, the finer the movement, the more the material will react, oscillating like an elastic coil, and increase the likelihood of stringing. So it's best to start with a lower movement speed for TPU.
CRUISE SPEEDS
- PLA: 120-180 mm/s
- PETG: 120 mm/s
- ABS: 100-150 mm/s
- TPU: 30-90 mm/s
Retraction speed
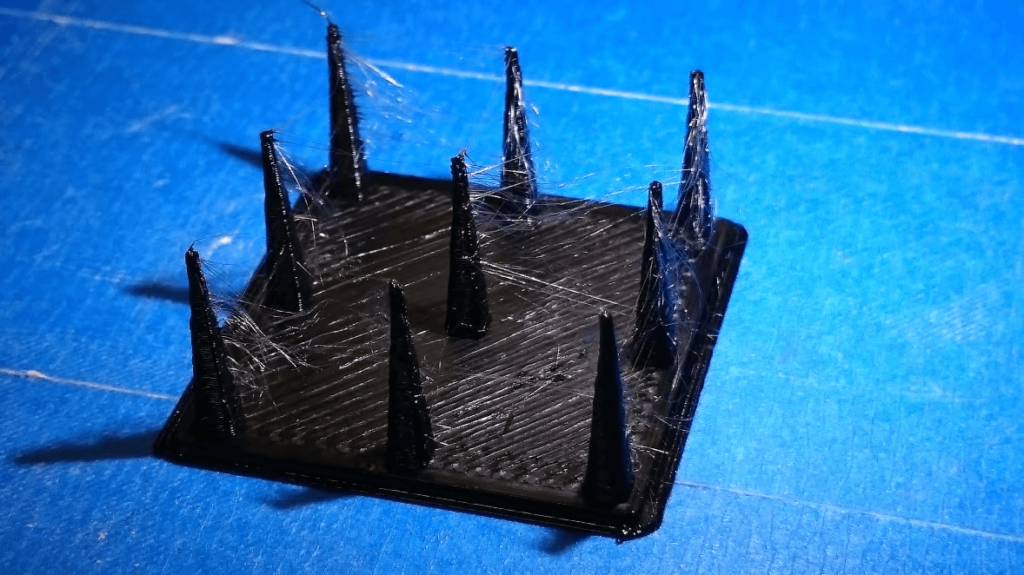
Stringing can indicate that the retraction speed is not quite right (Source: cliquot22 via Thingiverse )
The retraction rate ( Retraction speed ) adjusts how quickly the printer pulls the filament back before the motion moves. This setting is critical for reducing threading and improving print quality. Too slow and you could be left with unsightly strings and smudges on your prints. Too fast and you may experience the symptoms of thread grinding, which also includes stringing and spots.
Just like with travel speed, you'll want to strike a balance with this setup for TPU and PETG. Because TPU is elastic, rapid retraction can cause clogging and jamming in the nozzle, as well as stringing and smearing on the printed object. A similar result can be obtained with PETG. For PLA and ABS, higher retraction speeds may be more effective.
To determine the optimal retract speed for your printer, print a retract test at various retract speeds, starting at 25 mm/s and adjusting in 5 mm/s increments. Look out for mesh or wood-like strings that extend between the model's spikes. The perfect retract rate should be the highest value that minimizes these artifacts without compromising thread flow.
Along with the retraction speed, you also need to specify the retraction distance in the slicer software, which is in the range of 1 to 5 mm for most materials.
To fine-tune the retraction speed better, this setting is usually split into two more secondary settings:
- Retraction speed ( Retract speed) determines how fast retraction (the actual pulling back of the thread) takes place. This is usually the same as your overall retract speed and setting it follows the same process.
- Base speed (Prime speed) determines how quickly the filament is reinserted after initial retraction, in preparation for further printing. Increasing this speed will result in reduced print time and less spotting from exposing the plastic to heat for too long. However, increasing it too much may also cause the freshly inserted filament to not heat up enough before printing resumes. For most users, keeping the same setting as the overall retract speed should work fine.
RETRACT SPEEDS
- PLA: 40-60 mm/s
- PETG: 25-45 mm/s
- ABS: 40-60 mm/s
- TPU: 15-30 mm/s
Additional settings
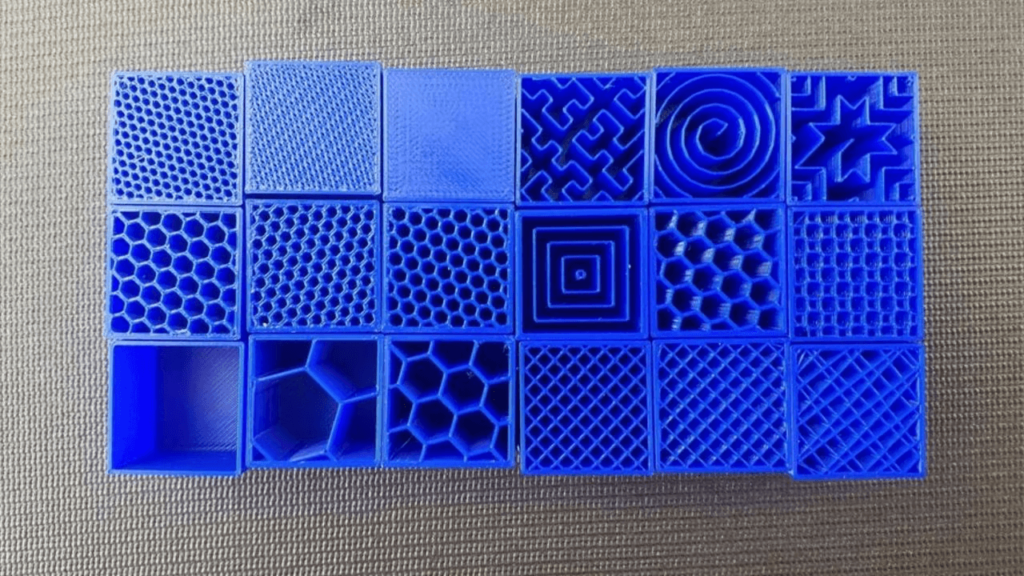
Infill is an influential element of 3D printing that affects print speed and part strength (Source: Kronr via Pinshape)
The speed of your 3D printer isn't just determined by "speed" specifically. It is also greatly affected by how much plastic and how thick each layer of the 3D print is extruded. These settings are incredibly detailed, so we'll only go over general information about how each affects print speed.
- Shells determines how many perimeters of plastic are extruded to form the outline of your part. Increasing the number of shells increases the strength of the part, but also the print time.
- Infill is the internal structure generated when printing the inside of 3D prints. The fill pattern will slightly affect the print speed, while the fill density will drastically change the print time. A higher fill density will increase the strength of the part, but also the print time.
- Layer height has a significant impact on how quickly your prints come out. The higher your layer height, the thicker each layer of your 3D print is and thus, the faster your print is completed. Adjust this based on how fine detail your print requires.
Temperature
The faster you type, the more heat you'll need (Source: MatterHackers via YouTube)
Another important consideration is how hot you print. Although it will not affect speed per se, a hot end temperature insufficient for speed will definitely affect print quality. The filament needs enough time and heat to melt properly before it is extruded through the die.
Print speed directly affects how long the thread spends on the hot end. Faster means less melt time, and slower means more time - both of which can lead to extrusion problems when the speed-temperature ratio becomes too unbalanced.
Therefore, print temperature should be the next setting to consider after adjusting your speed settings. Faster print speeds may require an increased temperature, while slower print speeds may require a lower temperature.
0 Comments