UltiMakar Cura предлага мощна гама от настройки, с които да подобрявате вашия 3D разпечатки. Научете за основните настройки за поддръжка на Cura и как най-добре да поддържате вашите разпечатки.
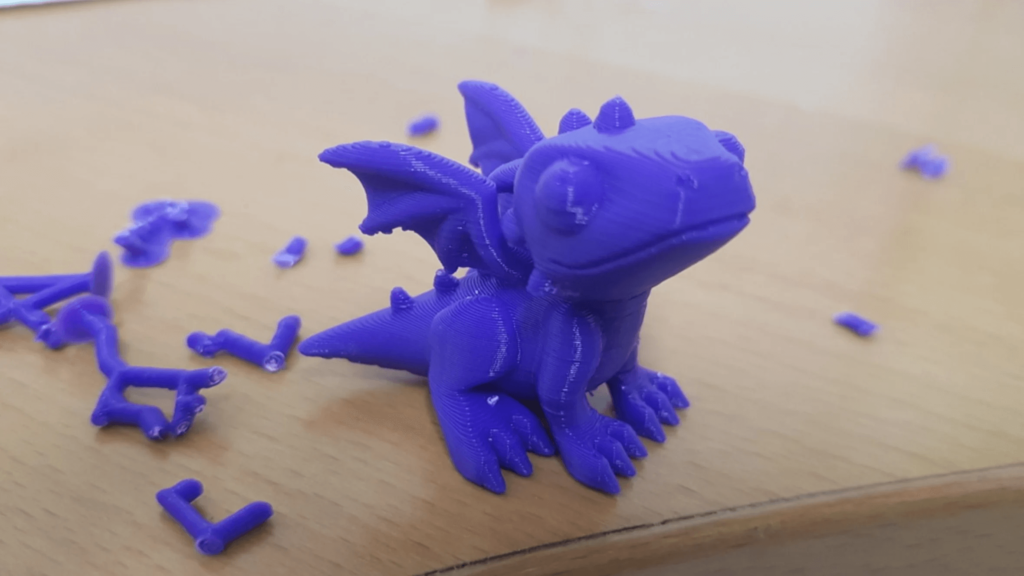
Всички fused deposition modeling (FDM) 3D принтери създават обекти чрез екструдиране слой след слой от термопластичен материал. Следователно всеки слой трябва да бъде задържан от слоя под него. Когато няма слой под него (какъвто е случаят с надвеси и мостове ), моделът може просто да се нуждае от поддържащи структури . Те се отпечатват с основния модел и се отделят по време на последваща обработка.
„Това не звучи твърде ужасно“, може да си помислите. Въпреки това, думата “поддръжка” ужасява много производители. В края на краищата, поддържащите структури не само изискват повече материал, но също така са известни с това, че оказват отрицателно въздействие върху повърхността на печат и че премахването им е трудно.
За съжаление при 3D принтирането е факт, че някои модели просто се нуждаят от опори. Но това не означава, че не можем да ги оптимизираме, като коригираме подходящите настройки.
В тази статия първо ще говорим за това кога имате нужда и кога нямате нужда от поддръжка. След това ще се потопим в някои важни настройки за поддръжка на Cura, за да коригираме за най-добри резултати. Въпреки че се фокусираме върху Cura, основните принципи зад настройките могат да бъдат приложени към различни други слайсери. Така че нека се заемем!
Имате ли нужда от подпори?
Има няколко неща, които трябва да имате предвид, за да определите дали имате нужда от поддържащи структури или не:
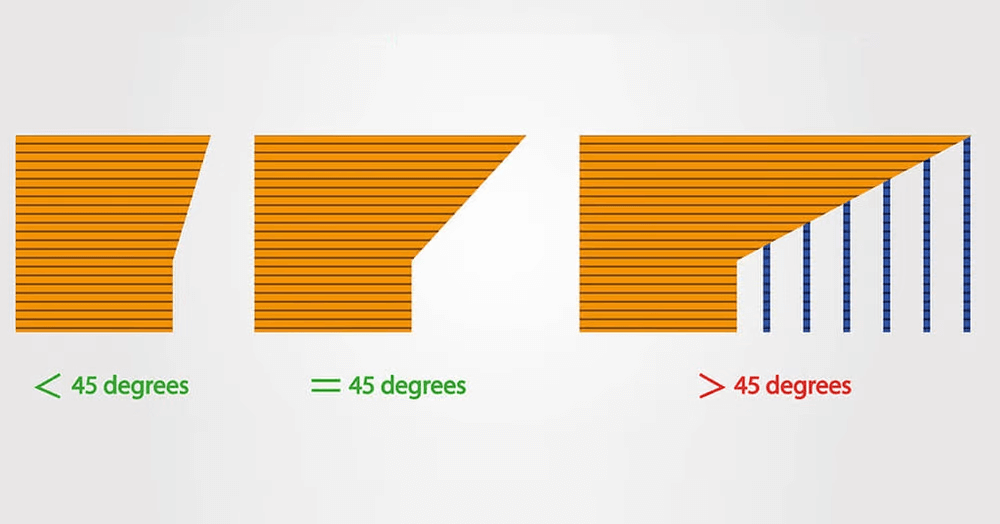
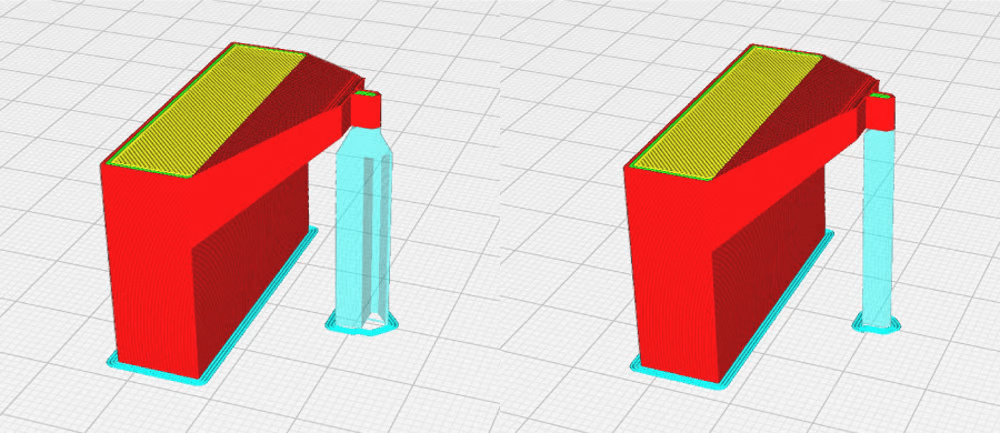
- Правило за 45° (надвеси): Ако надвесите са по-големи от 45° (по отношение на вертикалата), те ще се нуждаят от опора. За да тествате възможностите на надвеса на вашия принтер, опитайте да отпечатате тест за надвес .
- Правило за 5 mm (мостове): Ако мостовете са по-широки от 5 mm, може да се нуждаят от опора. Разбира се, не всички 3D принтери са еднакви. Някои могат да отпечатат по-големи разстояния, докато други почти не могат да отпечатат никакъв обхват. Опитайте да отпечатате мостов тест, за да определите кога вашият принтер се нуждае от поддръжка. Ще разберете прага, след като откриете разстоянието, на което се спускат мостовете на вашия принтер.
След това нека се потопим в настройките, за да усъвършенстваме опорите, в случай че сте решили, че имате нужда от тях.
Настройки
UltiMaker Cura има няколко настройки, които да ви помогнат да оптимизирате опорите на вашите модели. Ето как да започнете:
- Когато за първи път отворите Cura, щракнете върху „Settings“. Тук можете да коригирате настройки, които иначе са скрити под „Recommended“ настройки.
- Щракнете с левия бутон върху менюто (три реда вдясно от лентата за търсене) и изберете „Configure Setting Visibility…“
- Изберете от падащото меню “All”.
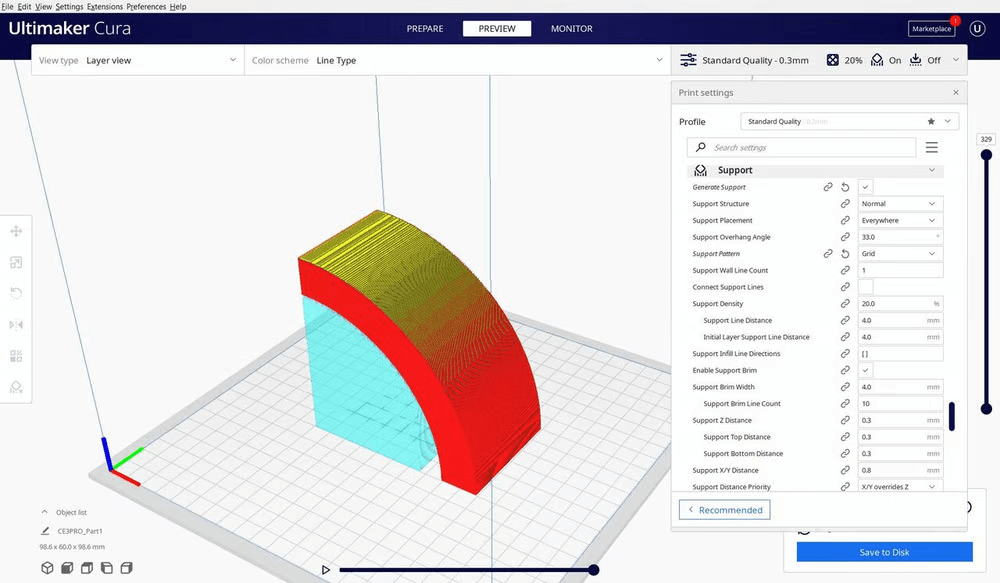
Сега можете да видите всички настройки, които UltiMaker предоставя в Cura. Превъртете надолу до Настройки за поддръжка, щракнете върху „Generate Support“ и нека започнем!
Eкструдер за надвеса
С нарастването на 3D принтерите с двоен екструдер идва възможността за отпечатване на основните части от един материал и използване на другия екструдер за отпечатване на разтворими (често PVA ) опори. След отпечатване просто накиснете вашата част в подходящия разтвор и забравете за изключителното скучно отстраняване на поддържащия материал, изисквано преди.
В Cura можете да изберете кой екструдер искате да отпечата коя секция от вашите поддържащи структури, така че можете да печатате с комбинация от PVA (или друг разтворим материал) и нишка по ваш избор.
Можете да дефинирате екструдера за следните опорни секции:
- Support infill
- First layer support
- Support interface
- Support roof
- Support floor
Като начало, нека разгледаме основните настройки по отношение на структурните аспекти на опорите.
Дърво
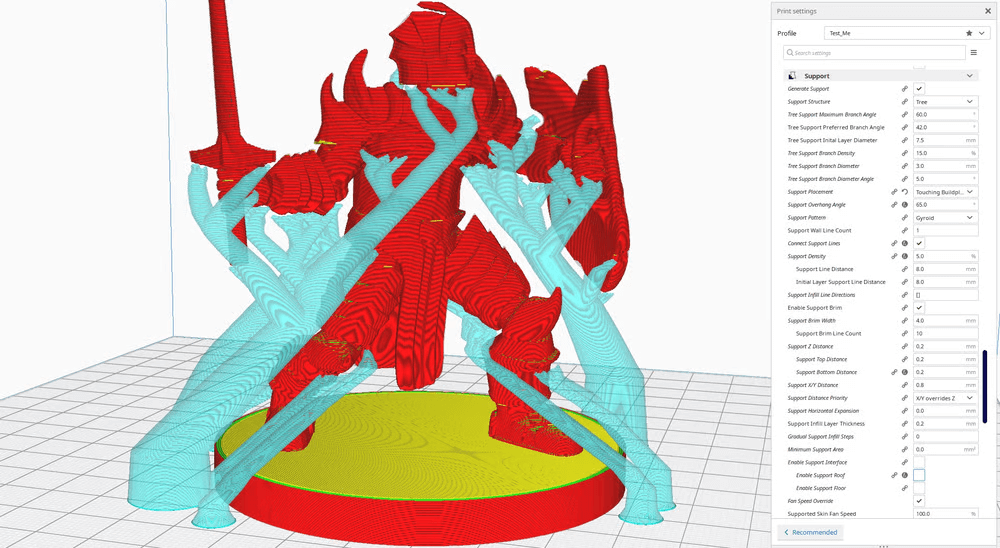
Опора тип “дърво /Tree/ ” е алтернатива на типично правия и вертикален вариант. За да активирате опори на дърво, изберете „Tree“ в падащото меню “Support Structure”.
Както подсказва името, опората за дърво е куха, която поддържа модели с „клони“, които се извиват с различни ъгли, размери и пътеки, които могат да бъдат определени от определени параметри в Cura.
Настройките по подразбиране са доста надеждни, но тук са всички настройки, които могат да се коригират:
- Tree Support Branch Angle: Максимален ъгъл на разделяне на клона.
- Tree Support Branch Distance: Разстояние между опорните точки на клоните. Това е плътността на опората на дървото.
- Tree Support Branch Diameter: Диаметър на най-тънките клони в опората.
- Tree Support Trunk Diameter: Диаметър на най-дебелите клони в опората.
- Tree Support Branch Diameter Angle: Увеличаването на ъгъла увеличава диаметъра на дъното на клоните.
- Tree Support Collision Resolution: Резолюция, използвана за изчисляване дали вашият модел и опора на дърво ще се сблъскат.
Тези настройки са доста ясни, просто имайте предвид компромиса между силата на дървото и възможността за премахване.
Модел
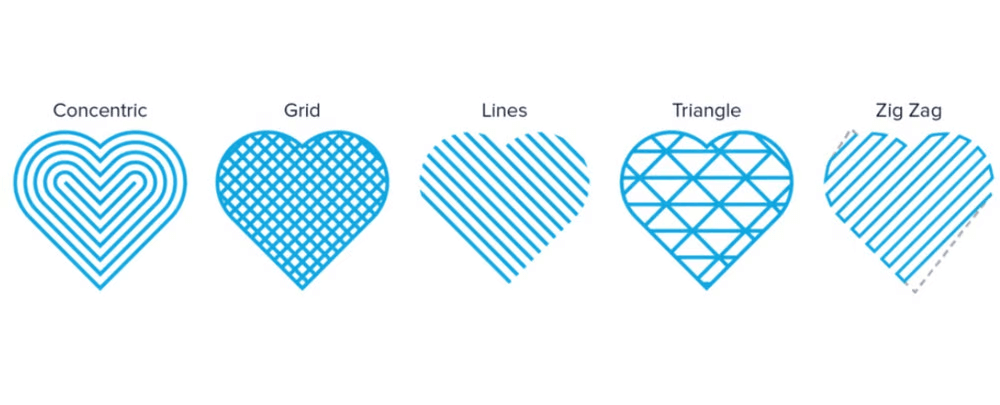
Cura предлага различни модели на опорни структури. Всеки показва баланс между здравина и лекота на премахване, а някои са по-подходящи за определени форми. Ето списък на най-използваните модели:
БЪРЗО И ЛЕСНО
- Zig Zag е най-бързият за печат и най-лесният за премахване.
- Lines са следващата стъпка. Той все още прави страхотни, лесни за премахване опори, но е малко по-здрав от зигзаг.
- Concentric е най-подходящ за модели с форми, подобни на сфери или цилиндри. Има тенденция да бъде малко по-силен от зигзаг и линии.
Имайте предвид, че поради еднопосочната природа на горните три модела, те са склонни да бъдат по-уязвими. Вибрациите и слабите поддържащи структури, например, могат да доведат до това, че слоя не се подрежда перфектно с предишните слоеве, което може да причини проблеми в дългосрочен план.
Освен това, ако тези модели бъдат захванати дори леко от движеща се дюза, те могат да се отделят от повърхността отдолу и да се срутят.
СИЛЕН
И Grids , и Triangles са страхотни модели за постигане на здрави опори. Те са по-устойчиви на вибрации; те обаче увеличават времето за печат и като цяло показват повече контакт с опорните зони. Това може да доведе до по-трудна последваща обработка.
Плътност
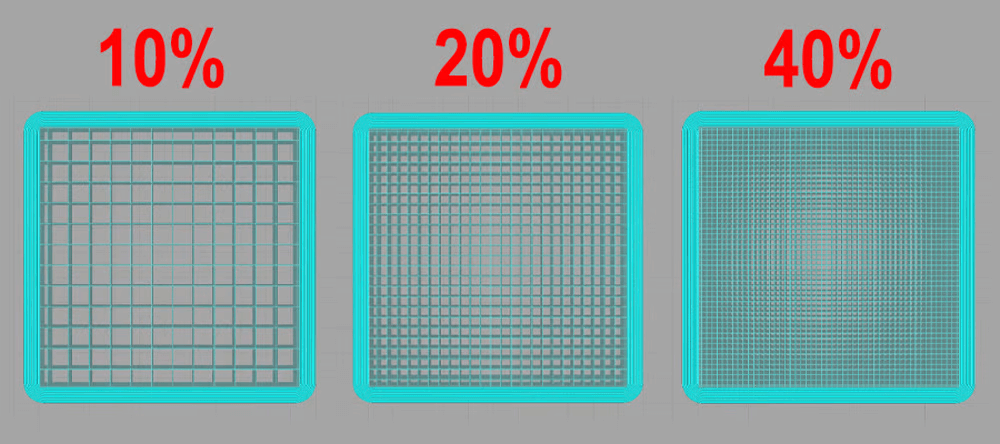
Плътността на опората е подобна на плътността на пълнежа, тъй като правите компромис между сила, скорост и лекота на отстраняване.
Носещите структури с висока плътност обикновено са по-твърди и могат да издържат на вибрации. Освен това увеличеният контакт с надвесите прави опорите с висока плътност идеални за сложни или детайлни опорни зони. С опори с висока плътност очаквайте по-надеждна поддръжка, но също така и по-голямо използване на нишки, по-дълго време за печат и по-трудна последваща обработка.
Подпорите с ниска плътност са идеални за нормални опорни зони, които не изискват много контактни точки. Те са по-склонни да реагират на вибрации по време на печат, но намаляват разходите за нишка, времето за печат и трудността при отстраняване на опората.
20% плътност на поддръжка е чудесно място за начало, но коригирайте тази стойност според нуждите на вашия модел.
Дебелина на запълващия слой

За да намалите времето за печат на поддръжка, можете да отпечатате слоеве за запълване на поддръжка с по-ниска разделителна способност. Поддръжката не трябва да изглежда красива, тя просто трябва да поддържа вашия основен модел. Ако решите да печатате с големи височини на поддържащия слой, не забравяйте да направите дебелината на поддържащия слой за запълване точно кратна на разделителната способност на вашия модел. В противен случай Cura ще го закръгли до следващото кратно, което може да е повече от планираното.
Стъпки за постепенна поддръжка
Тази настройка определя колко пъти Cura ще намали плътността на пълнежа на опората, колкото по-далеч е от опорния покривен слой. Тази настройка може да ви помогне да спестите материали за поддръжка и време за печат, като използвате само висока плътност на поддръжката, когато сте в контакт с или близо до модела, който искате да поддържате.
Можете също така да определите височината на стъпката за постепенно запълване, за да зададете колко близо са стъпките за плътност.
Кули
И накрая, за много малки надвиснали зони, Cura ви позволява да отпечатате опори като кули, които се стесняват в горната част, за да поддържат области, по-малки от зададения от вас минимален диаметър. (Другите поддържащи зони ще използват нормални поддържащи структури.)
За да не са твърде слаби тези опорни кули, те имат по-голям диаметър от площта, която поддържат. Винаги можете да промените този диаметър в Cura. Можете също така да регулирате ъгъла, под който вашите кули се издигат до точка, правейки кулите по-плоски или стрелкови.
Поставяне

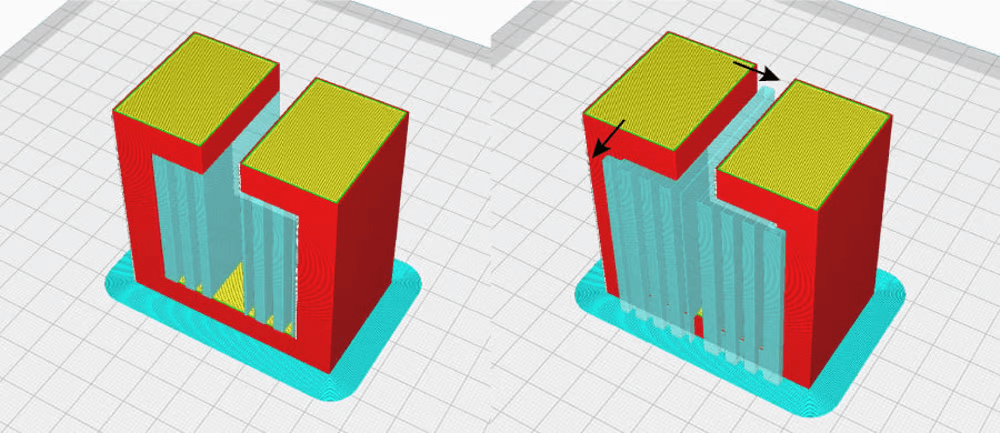
След като решите вида на опорната структура, която искате, следващата настройка е “Support Placement”. Тук можете да изберете „Everywhere“ или „Touching Buildplate“. Както вероятно се досещате, това определя дали опорите се отпечатват навсякъде (където е необходимо) или произхождат само от плочата за изграждане.
В повечето случаи Touching Buildplate е най-добрият, защото изграждането на опора навсякъде може да причини някои неприятни несъвършенства по повърхността на вашия печат.
Понякога обаче просто имате нужда от опори навсякъде. Такъв е случаят с особено сложни модели, които биха били невъзможни за отпечатване без носещи конструкции.
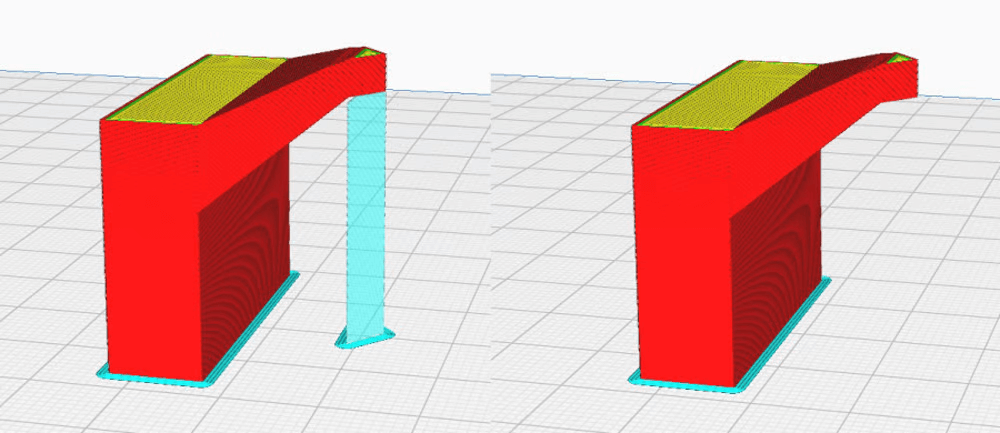
Ъгъл на надвес /Overhang Angle/
С тази настройка можете да укажете ъгъла на надвеса, отвъд който искате да генерирате опори. Както споменахме по-рано, ъгълът по подразбиране обикновено е 45°. Това обаче може да е различно за вашата конкретна машина. Поиграйте си с тест за надвес, за да определите колко добре вашата машина се справя с различни ъгли.
Ъгълът на опорния надвес също може да се различава за всеки печат. Ако искате да поддържате мостове само в конкретен модел, можете да изберете 90°. Ако искате опора за всеки надвес, изберете 0°.
Минимална поддържаща площ
Тази настройка просто определя минималната площ за поддръжка, като филтрира местата, където не искате поддръжка. Тази настройка може да ви спести ненужен разход на материал и време за печат.
Следват допълнителни функции или материали, които са добавени или създадени за поддържащите структури.
Support Brim
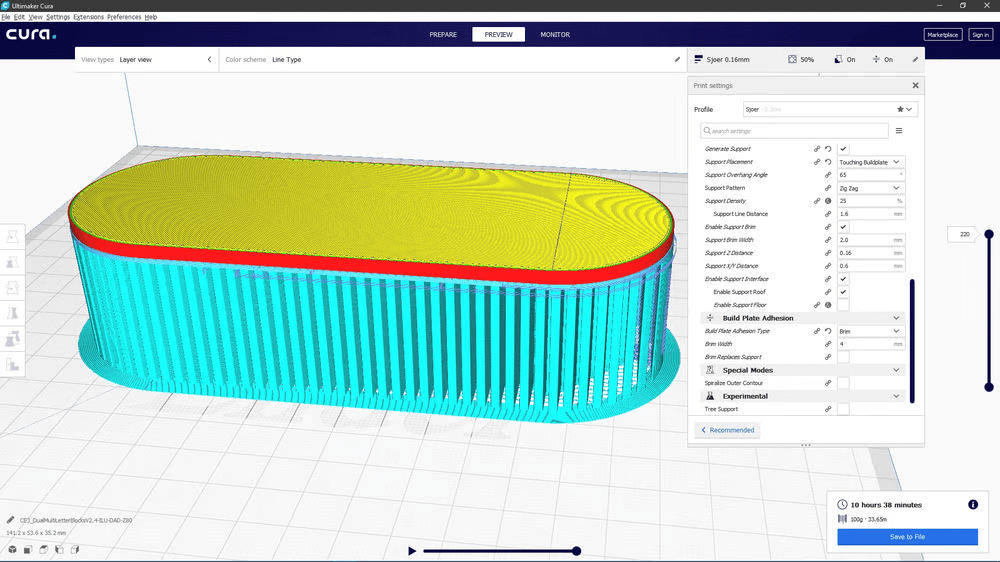
sfjuocekr чрез Github )
Точно като ръбовете на модела , Support brims са концентрични линии от материал, отпечатани от вътрешната страна на вашите опорни конструкции, за да подобрят адхезията на строителната плоча върху вашия първоначален слой. Активирането им в Cura ще подобри надеждността на опорните структури, като се увери, че опорите няма да изскочат от строителната плоча или да се преобърнат.
Support brims са идеални, ако имате проблеми със сцеплението или използвате опорни структури с малка основа. Затова увеличете настройките на опорния ръб за по-здраво захващане на плочата.
Join Distance
Support Join Distance регулира максималното хоризонтално разстояние между опорните конструкции. Когато две поддържащи структури са по-близо една до друга от тази стойност, те ще бъдат отпечатани като една структура. Колкото по-висока е стойността за това разстояние, толкова по-бързо опорите ще се слеят. Ако опорните структури са особено тънки, по-голямото разстояние на съединяване може да помогне да се осигури по-здрава опора за модела.
Ако обаче зададете тази стойност твърде висока, опорните структури може да станат плътни и трудни за премахване.
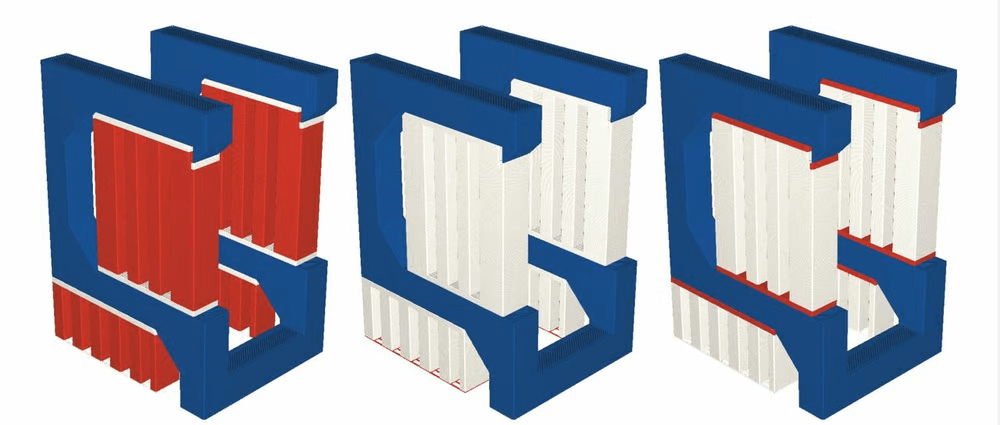
Support Interface
Ако имате нужда от по-плавна връзка между вашия модел и поддържащи структури, можете да активирате интерфейса за поддръжка. Това е плътна обшивка на покрива и пода на вашата опора, която осигурява плътна контактна повърхност с модела. Когато е активиран, интерфейсът за поддръжка прави премахването на поддръжка по-трудно, така че имайте предвид компромиса.
При тази настройка в рамките на Cura можете да регулирате дебелината на поддържания интерфейс, разделителната способност, плътността, шарката, площта, хоризонталното разширение и посоките на линиите.
Последно, но определено не на последно място, следните настройки са свързани с общия размер на носещите конструкции (и могат да означават тяхното уголемяване или намаляване, например).
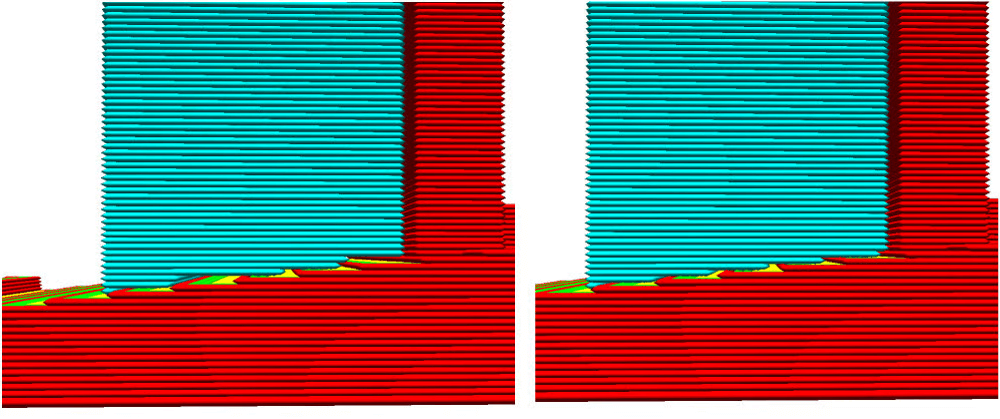
Z разстояние
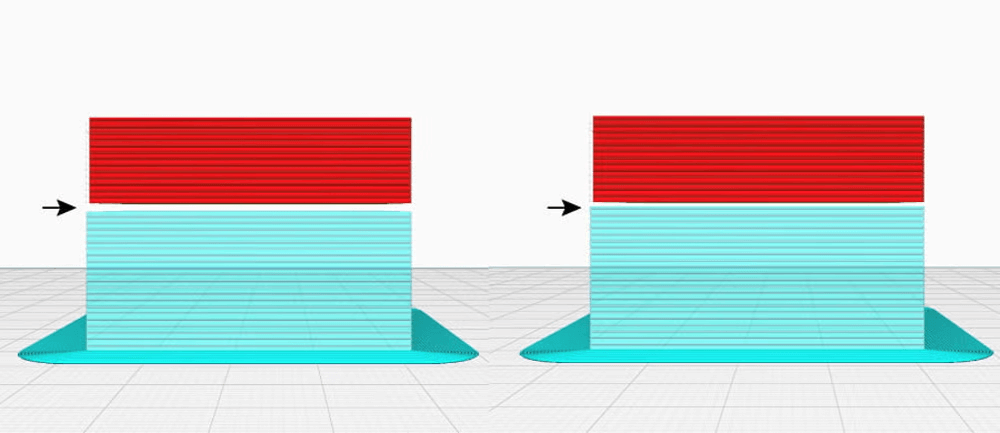
Тази важна настройка определя разстоянието от модела до горната и долната част на опората. Тази настройка има две секции: Горно разстояние и Долно разстояние.
Високата стойност за тези разстояния създава по-голяма празнина между модела и опората, което означава по-лесна последваща обработка. Създава по-гладка повърхност на модела поради намаления брой контактни точки. Ниската стойност е полезна, когато се опитвате да поддържате сложни надвеси, които изискват висока детайлност. Но ниската стойност прави опорите по-трудни за премахване.
Както винаги, поиграйте си с някои разстояния, за да намерите идеалната стойност за вашия принтер. Просто се уверете, че вашето Z разстояние е кратно на височината на вашия слой, така че вашият принтер да може точно да постигне това разстояние.
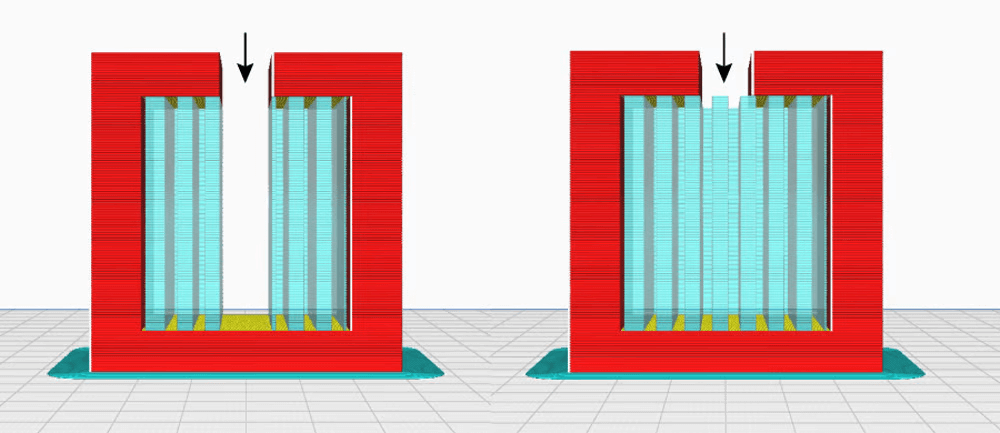
Разстояние X/Y
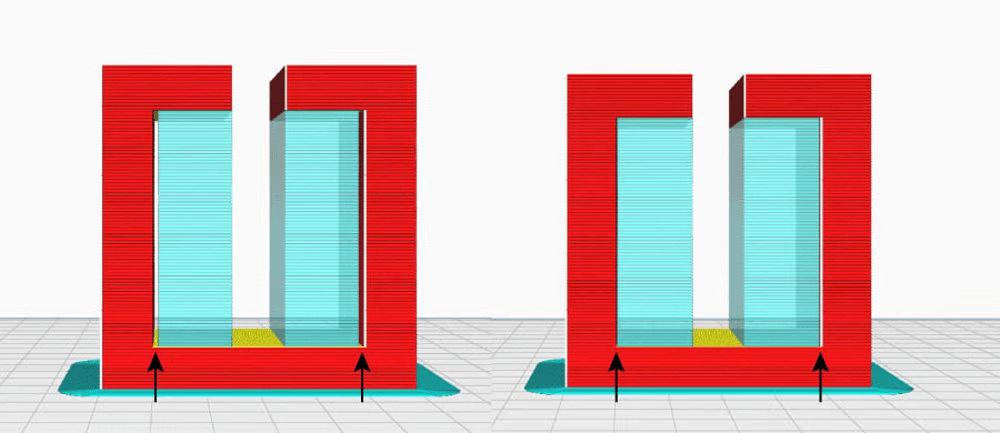
Разстоянието X/Y е подобно на разстоянието Z. Регулира хоризонталното разстояние между модела и неговата опора. Отново, колкото по-голямо е разстоянието, толкова по-лесен е процесът на премахване на опората. Колкото по-малко е разстоянието, толкова по-здрава е опорната конструкция.
Обикновено по-голямото разстояние X/Y ще означава по-добро покритие на повърхността на вертикалните секции. Ако вертикалните части във вашите разпечатки са нагрубени от съседните опори, опитайте да увеличите разстоянието X/Y.
По-ниското разстояние X/Y ще доведе до по-добра опора за надвеси, а именно тези до вертикални повърхности. Въпреки това, те могат да причинят повърхностни несъвършенства на вертикални повърхности и могат да направят последващата обработка трудна.
Distance Priority
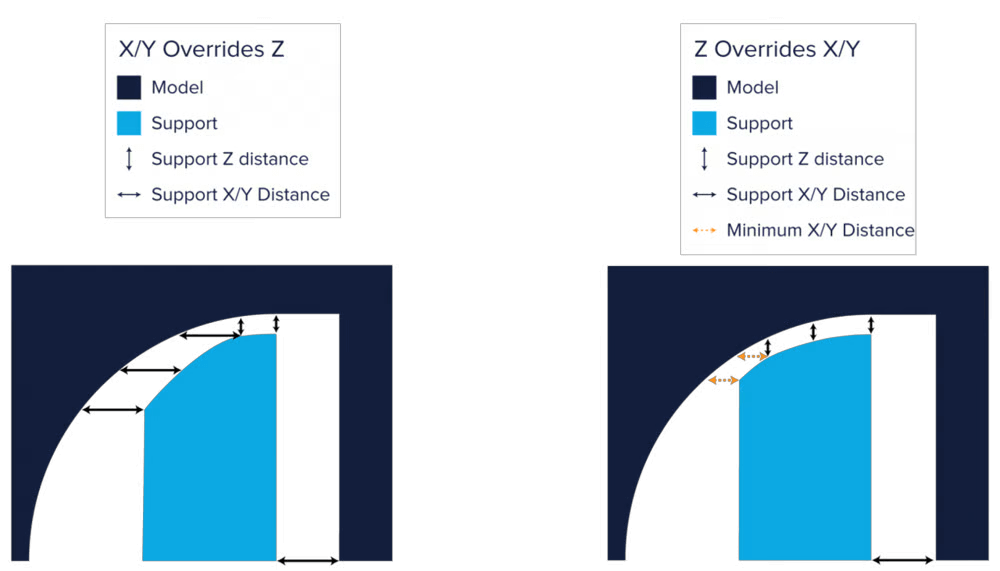
В зависимост от типа надвес, който се опитвате да отпечатате, разстоянието Z може да противоречи на разстоянието X/Y. В Cura обаче можете да зададете приоритети на тези разстояния, така че в случай на противоречие да се поддържа най-важното разстояние.
Обикновено е най-добре Z да замени X/Y, защото разстоянието Z е това, което наистина държи модела. Можете обаче да промените тази настройка за отмяна, ако определен модел го изисква.
Можете също да зададете минимално разстояние X/Y. След това, дори когато разстоянието Z има приоритет, минималното разстояние X/Y все още се поддържа.
Stair Step Height
Ако сте избрали „Навсякъде“ за поставяне на опора, височината на стълбището е важен параметър, който трябва да имате предвид. Тази настройка определя доколко поддържащият материал следва контурите на вашия модел. Колкото по-ниска е височината на стълбището, толкова по-близка и по-гладка е връзката, което прави опорните интерфейсни повърхности по-гладки. Колкото по-висока е височината на стълбището, толкова по-груба е връзката, което прави премахването на опората лесно.
Horizontal Expansion
Когато областите, изискващи опора, са много тънки, за вашия принтер е трудно да създаде здрави структури, които да поддържат такава малка площ. Тази настройка ви позволява да зададете хоризонтално разширение, така че дори малки опорни зони да бъдат адекватно поддържани.
Въвеждането на голяма стойност за тази настройка винаги ще доведе до по-здрави опори, но тази настройка изисква повече нишка.
0 Comments