
What are welding and fixing fixtures?
The use of 3D printing is increasing in many industries to make one or more of the production parts. Many of these one-off parts are fixtures that help in the production of other parts. They often improve the efficiency of assembly lines by performing unique and specialized tasks. These production aids vary dramatically in their complexity and use. The fixture can be as simple as a small tool to help an assembly line worker put emblems on cars, or as complex as a robotic fixture with internal passages for pneumatics and electronics.
Consoles and fixtures are not a new aspect of the manufacturing industry. Production aids are an important aspect of a factory that can produce goods with a level of accuracy and consistency. A simple clamping frame used to hold a part during drilling will ensure that each part will have a consistent hole location and create an identical part for the rest of the assembly line to use.
Why are we 3D printing these parts?
Welding fixtures and fixing fixtures have largely been produced up to this point using traditional manufacturing techniques. Most of the time they are made of aluminum or plastic block. Machining takes considerable time and skill to produce parts. The more complex the geometry, the longer this process takes to machine a working part. It can take up to several weeks for a part to be designed, machined and sent to the factory assembly line. If design changes are needed, the whole process starts over, resulting in even more time, i.e. lost with each iteration. The massive reduction in time is the most appealing aspect of supplement manufacturing. Instead of fixtures taking weeks to manufacture, engineers can rely on additive manufacturing to produce parts within hours. The fixture can be designed, printed in 3D, and if changes are required, they can often be completed within the same day of parts production.
Using additive manufacturing to replace traditional welding and fixing fixtures allows the company the ability to maintain a digital inventory of its parts. At very short notice, a failed part can be 3D printed in a matter of hours and replaced with minimal downtime. These parts are available for - search and with the use of an electronic format, these parts are printed with optimized print settings that speed up print time while ensuring that the part has the strength and stiffness required to perform as intended.
There are softwares that provide the tools to validate and optimize parts to improve part performance and print time. The user can experiment with different load cases that mimic the loads that jigs and fixtures would experience during use. The user can practically experiment with many different materials and choose the right material for the application. For example, if a part needs to be stiffer, a material filled with carbon fiber can be compared to a standard material. All of this with "virtual experimentation" can be done before the first part is even printed, and it's done in software.
Let's look at an example device with such optimization software
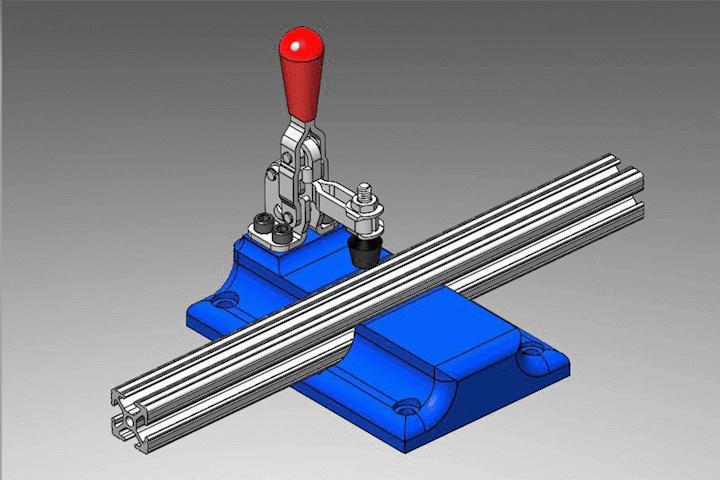
To better understand how additive manufacturing is used for welding and fixing fixtures, consider the following example of a fixture part. The part shown in the photos above is a simple fixture used to securely hold a 25mm by 25mm aluminum profile. It is integrated with an off-the-shelf bracket that is bolted to the part to simplify design and ease of manufacture. This fixture can be seen on an assembly line where a worker must hold a part firmly for a short time and then release it to move on to the next assembly process.
This part of the widget has several key requirements:
- The clamp is capable of applying a force of 900N to the aluminum profile.
- The fastening holes must be able to support the force of 900N.
- The maximum deviation can be no more than 1.5 mm.
- The safety factor should be 1.5 or greater.
- It should have a print time of 12 hours or less to limit assembly line downtime.
Within a minute and a half, with the appropriate software, settings and simulation are made for the setup of this fixture. For any simulation, setup is one of the most important aspects, and with surface selection tools, users can apply real forces to these parts virtually.
Once the part setup is complete, the validation process follows. Current user-defined printer settings are used to verify that the part will meet key requirements and make recommendations for further optimization. The validation process of this support takes less than a minute and the software tells the user if this part will be used as intended and for the specific load. This is a very powerful check and often eliminates many of the first print break cycles that a part may go through in testing. The validation step will tell you if the part is over-engineered, under-engineered, or just won't work even when printed with 100% infill.
After the user completes the check, they can manually make changes to the print settings or use the optimizer. Optimization will manipulate print settings and apply modifier meshes to high stress areas of the part to provide the user with a part that meets the user's chosen requirements, but also optimizes print time and material usage. The analysis generates a sufficient number of ranked solutions allowing the user to choose the most appropriate solution for their needs.
For this prop, for example, it was determined during the confirmation stage that this part would not hold up to our print clamping force of the standard ABS material on 100% fill. Using software showed that the pressed aluminum material would likely cause a crack to form along the inner edge of the fixture, forming a low factor of safety in the areas shown in the figure below.
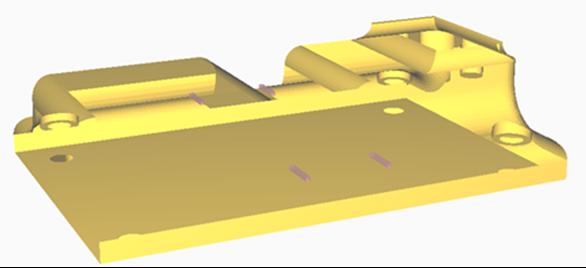
The message received from the validation provides the user with two options to improve the part to meet the stated requirements for this fixture. The first option is to try a stronger material, while the second option is to change the geometry of the part to improve the areas shaded in purple. In this example, a carbon fiber filled Nylon material was chosen to replace ABS because of its excellent strength properties and printability.
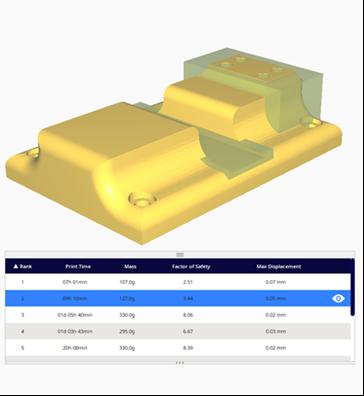
Selecting the optimization, the software quickly optimizes the part and creates the solution (pictured above) with two modifier meshes to increase the strength and stiffness of the parts where needed. This solution meets all of our requirements while minimizing print time and material usage.
The shift from traditional manufacturing methods to additive manufacturing is a common trend in the industry, and this is due to lower manufacturing costs and incredible time savings that translate into huge cost savings. Using optimization software is another tool in the user's toolbox to help improve these fixtures to meet part requirements and budgets. Using the right software and additive manufacturing to create these gadgets will help companies improve efficiency and help push the limits of this industry.
0 Comments