6. Helper for better adhesion
An adhesion assistant is a physical function added to the fingerprint - generated automatically by the 3D model cutting software. The adhesion of the bed is how well a part adheres to the building surface and is usually most important for the first layer. The adhesion assistant is available in three main forms:
- Skirt: is a distant and detached perimeter that outlines your print. Skirt they don't provide any real help with model adhesion, but they do help the material flow through the nozzle in time for the first coat to begin. They can also be useful for making manual adjustments to bed level. Unless otherwise specified, many 3D slicing software will automatically generate Skirt for each print.
- Brim: Brim is a set of lines attached to the outside of the first layer of the printed part, covering a larger perimeter than its base. If your print was a cylinder, the periphery would literally look like the edge of a cylinder. As for adhesion assistants, this is the first step to take if the model has problems with adhesion to the bed (because, for example, it has small "feet").
- Raft: it is a complete base on which the 3D model itself is built. When printing the Raft cutters usually try to save material by spacing adjacent lines. This is the non-adherent approach to gluing the bed, as your print should never touch the surface. (This is often useful when distortion is a problem.)
As you might expect, a skirt takes the least amount of material and printing time, followed by a brim and then a raft.
7. Supports / Supports /
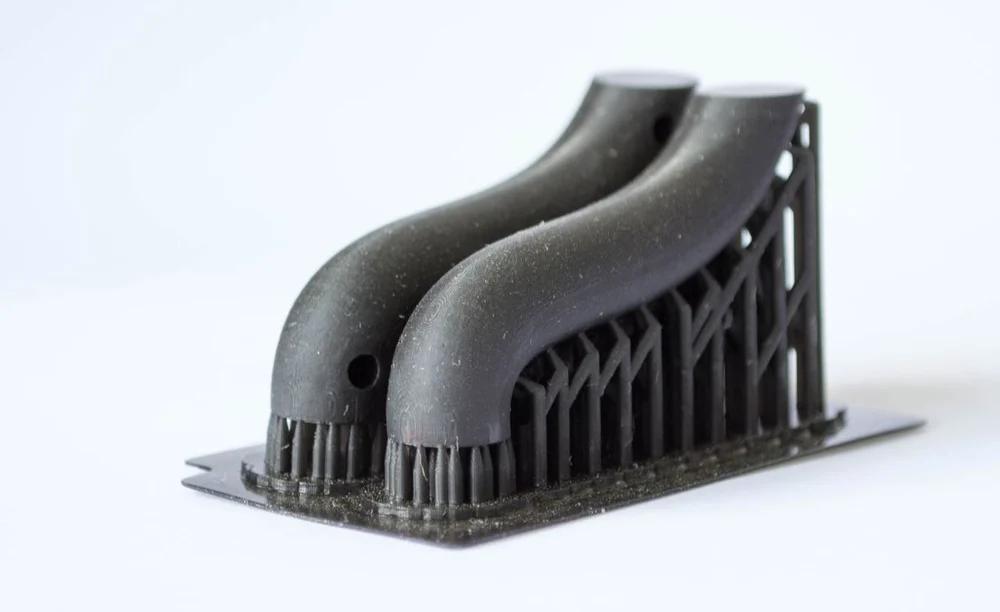
Supports are another important setting for slicing and like traction aids are selectable. Supports are structures that hold overhanging features on models if they meet certain requirements that can be set in your slicer.
These requirements include an overhang angle and a minimum bearing area. The first determines the minimum angle that the canopy must be above before the saw can create a support to hold it. The latter regulates the minimum area (in mm 2 ), which the supporting structure must be included in the footprint.
Other settings and support options are also very important. For example, the orientation of the part to be printed plays a key role in how the support structures are generated. Other support settings include print speed, fill density, and more. You shouldn't change these settings if your model doesn't need supports, but when necessary you can change them to find a balance between sufficient support and minimal material consumption.
8. Cooling
This is followed by cooling, which determines the fan power of your printer. Although there may be fans around the motherboard of the printer, the power supply, and the hot end, cooling usually only refers to the speed of your fan to partially cool the printed part. The speed of this fan can usually be adjusted and adjusted as a percentage of the total power.
When adjusting the speed of your partial cooling fan, consider the material you are currently printing with. For example, PLA requires moderate cooling, but ABS should not (as cooling can cause cracking). If your model has overhangs and you don't want to use supports, you can try increasing the cooling to cure the printed overhangs faster.
9. Infill
Filling is the internal filling of 3D printed parts and is a function unattainable in traditional production methods such as injection molding, chip removal processes, etc. Infill allows you to better control the strength, weight, material consumption and internal structure of a part without having to adjust its appearance or appearance. In the cutting software, the filling can be controlled using the filling density set as a percentage and pattern of filling, as well as the structure or shape of the filling.
Stronger fill patterns and higher fill densities will increase print time and use more material, but will increase the strength and weight of a part. There are many patterns to fill. Each has its own design and characteristics, such as concentric (for flexible parts), cubic (strong) and lines (fast). You can set the fill density with a particular pattern to achieve the desired combination of print force, material consumption and print time.
10. Shell Thickness
Finally, the thickness of the shell (or perimeter) represents the number of lines in the walls of your prints, whether they are on the side, top or bottom. The thickness of the shell is usually set as a value in millimeters or as the number of layers. It is made separately for the walls, as well as for the upper and lower layer.
The thickness of the shell is an important adjustment because it can significantly affect the strength of your model. The thicker the shell, the stronger the parts will be and the longer it will take to print. This is because the more shells you have, the harder layers or walls your machine needs to print.
0 Comments